Seamless gutters solve the most common headache homeowners have with rain control, which is failure at the joints. Traditional sectional gutters rely on dozens of seams sealed with caulk that weathers, shrinks, and cracks. Every one of those seams is a future drip. A seamless system is fabricated as one continuous length on site from a coil of metal, then custom sized to the eaves. Fewer seams mean fewer places to leak, and that single design shift makes a measurable difference in performance and longevity.
Over the past fifteen years I have seen the same scenario repeat on service calls. A homeowner notices soil washing away below a corner, paint peeling on a fascia board, or a musty smell in a crawlspace after storms. Up on the ladder you find a sectional run with a failed splice, water feathering over an edge, and rot creeping along the end grain. Swapping to seamless, setting proper slope, and right sizing the downspouts fixes the symptom and the cause. This guide distills what matters most when planning seamless gutters, from materials and profiles to hangers, guards, and the quiet details that stop leaks for the long haul.
What “seamless” really means
Seamless gutters still have seams at corners and end caps. The difference is that each straight run is a single piece, shaped by a portable roll-forming machine a Roofing contractor brings to your driveway. A standard house might need three to eight custom runs depending on its rooflines. Each run is measured, formed from coil stock, cut to length, and lifted into place. Miters at outside and inside corners are cut to fit, sealed, and fastened. Downspout outlets are punched after hanging so they land exactly over studs or backing.
The manufacturing step on site eliminates most of the joints that cause trouble. Fewer seams, paired with the right fasteners and sealants, give you a quieter system during heavy rain and far fewer callbacks for leaks. On a two story home that alone can save you several thousand dollars in repair and repainting over a decade.
Where leaks start and how seamless stops them
Leaks find the weak link. On gutters, the weak links are splices, poorly aligned hangers, and sealants applied to dirty metal. When you remove mid-span splices, you also reduce movement points. Metal expands and contracts with temperature swings. If you have five splices on a south-facing run, each joint works like a hinge. Over time the hinge opens. Long, continuous aluminum or steel, hung with enough rigid support and allowance for expansion at the ends, rides through winter and summer with far less stress.
The next step is managing slope. Gutters do not need a dramatic tilt. For residential eaves, 1/16 to 1/8 inch per foot is the sweet spot. That means a 40 foot run drops between 2.5 and 5 inches from high end to outlet. Too flat, water sits and breeds mosquitoes. Too steep, it looks crooked from the yard and surges past the outlet during downpours. An experienced installer will “cheat” the slope by splitting it to two outlets on long runs so the fascia line still reads straight to the eye.
Corners and end caps remain potential leak points, so sealant choice and prep matter. I have had best results with high quality tripolymer or urethane gutter sealants, not generic silicone. Clean the bright metal, dry it fully, apply a continuous bead, and tool it into the seam. In cold climates, keep sealants and coil stock warm in the truck before use. Warm material seals better and resists voids during the first freeze.
Materials that make sense
Most seamless gutters are aluminum because it balances weight, price, and corrosion resistance. But the best choice depends on climate, architecture, and budget. When a homeowner asks me which metal to pick, I look at salt exposure, tree cover, roof area, and the life expectancy they want.
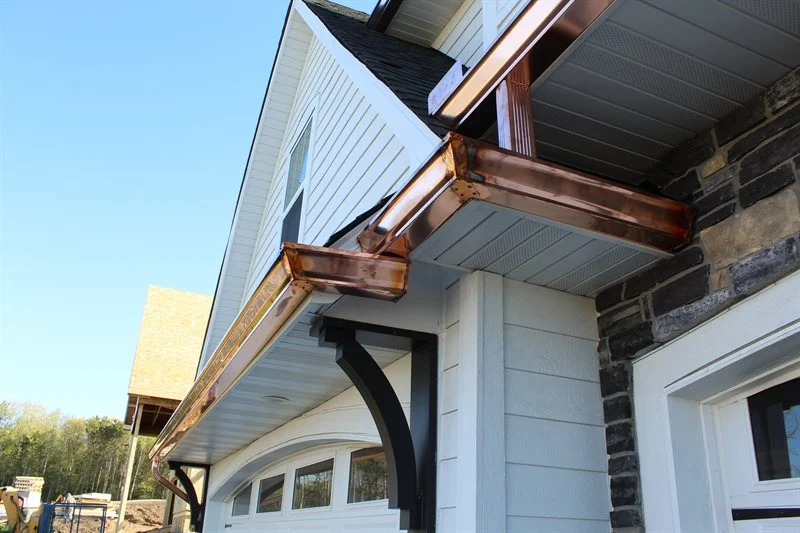
- Aluminum: The workhorse for residential jobs. Common thickness is 0.027 inch for budget work, 0.032 inch for durability. Aluminum resists rust, packs plenty of color options baked into the coil, and is easy to service. For most inland homes it offers the best value. Galvanized or galvalume steel: Stiffer than aluminum, better for long straight lines where you want crisp shadow lines. Steel is heavier, so it demands solid fastening into framing, not just fascia. In my experience it holds shape well under snow load. Expect to repaint over time where edges wear. Copper: A statement choice that lasts half a century or more if maintained. It patinas rather than peels. Skilled soldering at corners and outlets turns seams into permanent joints. Copper pairs well with slate and tile roofs and historic homes. Upfront cost is high, but total life cycle cost can be competitive over 40 plus years. Zinc: Less common, elegant, and durable. It weathers to a soft gray. Craft required is closer to copper, which limits who can install it well. For coastal air without direct salt spray, zinc performs admirably. Painted steel or specialty coatings: On modern homes I have used prefinished steel in darker shades to match fascia and standing seam roofs. The finish is tough if you avoid scratches during install.
If you are near the ocean, aluminum and copper both do fine if you avoid dissimilar metal contact. I use stainless fasteners, isolate hangers from treated lumber when needed, and avoid mixing copper with aluminum without separators. A Roofing contractor with coastal experience will have a short list of sealants and tapes that play nice together.
Profiles, sizes, and downspouts that actually handle storms
A system’s capacity depends on cross section and outlet sizing more than anything. K style gutters, with their ogee-like face, move more water than half round for the same nominal width because of the deeper back and bottom. A typical single family home uses 5 inch K style, but I often spec 6 inch on complex roofs with multiple valleys feeding one line. The difference in flow is noticeable. In a summer cloudburst a 6 inch run with 3 by 4 inch downspouts will keep up where a 5 inch system with 2 by 3 inch outlets would overflow.
Half round gutters look beautiful on bungalows and historic homes. They shed debris well because of the smooth interior curve, but they also need larger downspouts to match the capacity of a 5 or 6 inch K style. If you love the look, plan for 4 inch round spouts and extra hangers since half round uses external brackets.
Downspouts are not decoration. Undersized outlets are the bottleneck behind most complaints about waterfalls at the corners. If you see splash marks on the ground despite clean gutters, chances are the outlets are too small or too few. I space downspouts so no more than 600 to 800 square feet of roof drains to a single 2 by 3 spout, or up to 1,200 square feet for a 3 by 4, adjusting for local rainfall intensity. In coastal or storm-prone regions, step up the outlet size or add a second drop at a long run.
The invisible hardware that decides whether your system sags
Seamless or not, gutters only work as well as the hangers holding them. I prefer hidden hangers with stainless screws driven into framing or solid backing through the fascia, not just into the board itself if it is thin or weathered. Spacing every 24 inches is standard. In snow country I close that up to 16 inches on eaves that carry sliding snow off metal roofs. On long south-facing runs where heat moves the metal more, I include an expansion hanger or a slip joint so the system grows and shrinks without buckling.
Fascia condition matters. A Roofing contractor who also replaces fascia and drip edge can solve rot while hanging gutters, instead of ignoring it. I keep a few lengths of primed fascia in the truck for small swaps. For bigger repairs, many Siding companies and even a good Window contractor can coordinate trim and wrap work so you end with a weathertight assembly from shingle edge to foundation.
Integrating with roofing and siding the right way
Gutters sit at the junction of the roof, fascia, and sometimes a soffit vent channel. Get this junction wrong and you create rot traps and ice dams. Get it right and everything breathes and sheds water.
Look for a proper drip edge or drip flashing under the roofing that extends into the gutter. Without it, water can wick behind the gutter along the fascia. I check for felt or synthetic underlayment lapped over the drip edge on eaves. On re-roofs, coordinate the schedule so the Roofers and gutter crew align those laps correctly. If you are searching for a Roofing contractor near me, ask how they handle the roof-to-gutter transition. The answer should include drip edge, starter strip, and underlayment laps, not a vague “we flash it.”
On homes with vented soffits, the gutter should not block intake airflow. Oversized fascia wraps and crown details can crowd the gutter off the drip edge. A measured mockup before ordering coil stock avoids surprises on install day.
Guards, screens, and when to skip them
Gutter guards are not magic. They trade cleaning frequency for a higher upfront cost and occasional rinsing, and they can still clog at the outlet. I install guards most often under heavy leaf cover or pine stands. Micro-mesh systems do a good job with fine debris if they are pitched to match the roof and stiff enough to resist sag. Reverse curve covers shed leaves but can overshoot water on steep roofs in heavy rain.
If your roof has a low slope with wide valleys that feed a single run, guards can help tame the surge by dispersing flow across a screen. If your main debris is maple helicopters or pine needles, pick a guard that keeps small stuff out and is easy to hose off. If you live out on the plains with one windbreak tree, a clean 6 inch seamless run with large outlets and no guard may be the most reliable solution. The right choice is local, and a quick drive around your neighborhood after a energy efficient windows storm will tell you which designs handle your area’s rain and debris.
Cold climates, ice dams, and expansion
Seamless gutters do not cause ice dams. Heat loss through the roof deck, snow melt, and refreezing at the cold eave are to blame. That said, a gutter packed with ice is heavy, and heavy loads expose weak fasteners. In northern zones I upsize hangers, shorten spacing, and use screws that bite deep into framing. I also favor darker finishes on aluminum which warm slightly in the sun and release ice sooner in shoulder seasons.
Heat cables are a last resort. If you add them, lay them in a gentle loop in the gutter and continue one or two runs down each downspout to the elbow. Use cables rated for wet locations and control them with a temperature and moisture sensor so they do not run dry and cook the finish. Better still, improve attic insulation and air sealing so the roof stays cold, then let the gutters do their basic job.
Thermal expansion is real on 40 foot aluminum runs, especially on south walls. A 40 foot length can grow by a quarter inch or more between winter and summer afternoons. I leave tiny end gaps at closed ends under end caps and keep sealant flexible. On very long walls I break the run at a downspout with a factory-style expansion joint or split the slope to two outlets.
Measuring, estimating, and what the numbers look like
Homeowners often want a ballpark price before a site visit. For a typical one story house with straightforward eaves, seamless aluminum in 5 inch K style with 2 by 3 downspouts often lands in the range of 8 to 14 dollars per linear foot installed in many regions. Heavier gauge aluminum, 6 inch profiles, or larger downspouts push that to 12 to 20. Galvanized or painted steel can be similar to the upper side of aluminum, while copper jumps to 25 to 45 and beyond depending on soldered miters and custom work.
Corners, outlets, and labor complexity add cost beyond raw footage. A hip roof with four short runs and eight miters may cost as much as a long ranch with two simple runs, even if the total footage is lower. Two story work needs staging or taller ladders which adds time and safety gear. Expect a small mobilization fee if you are only replacing one side after a storm knockdown, since the roll former still has to come out and set up.
As for timing, a two person crew can often remove old sectional gutters and hang new seamless on an average single family home in a day, two at most if there are many corners or wrap repairs. If fascia boards are soft, plan on carpentry ahead of the install day. That is where a full-service Roofing contractor who also handles fascia and drip edge shines. The job is cleaner and faster than hiring separate trades for small fixes.
DIY or hire a pro
Ambitious DIYers sometimes rent or borrow a roll-forming machine, but I advise caution. The machine setup, coil handling, and safe staging on ladders or scaffolding take practice. A small kink in the coil at the feed can ripple down the whole run. A twisted run is unforgiving, and you cannot hide it with sealant. For most homeowners, hiring Roofers near me who roll and hang gutters weekly is the better value.
Where DIY does make sense is in maintenance. Washing out downspouts, checking for loose hangers, and keeping outlets clear buys you years. Even with guards, peek under the covers twice a year. I keep a short checklist for clients who prefer to do it themselves.
- Rinse and test each downspout with a hose, watching for slow flow or backwash at elbows. Check hanger screws after heavy storms and tighten any that back out. Clear splash blocks and extensions so water travels 5 to 10 feet from the foundation. Look for streaks or tiger striping on the face which can signal overflow and slope issues. Inspect sealant at end caps and miters each spring, especially on sun-baked runs.
The small details that protect foundations and siding
Gutters are not just about the eaves. What happens at ground level matters. I like downspout elbows that point into solid extensions, not flimsy accordion tubes that collapse when someone moves a trash can. If you cannot run a rigid extension, install an underground drain with a cleanout and pop-up emitter, but only if the grade allows for steady fall away from the house. In clay soils without good percolation, surface extensions are better than buried pipes that fill and freeze.
Aim discharge away from window wells and stoops. You would be surprised how often I see rot at the base of a door because a downspout splashes onto a step that wicks water under a threshold. A Window contractor may be the one called to fix that rot, but the root cause is almost always discharge location.
For siding, ensure the gutter back sits against a flat, plumb surface. If you have thick lap siding at the eave return, add a plumb fascia build-out so the gutter mounts square. Water behaves better in square channels. Siding companies that understand trim details will often pre-wrap fascia with aluminum or PVC before seamless gutters go on, making a tougher, paint-free assembly.
Choosing the right installer
The best system fails if the crew cuts corners. Get a short, specific scope in writing. It should include metal gauge, profile and size, hanger type and spacing, sealant brand, outlet size, and the plan for slope and downspout locations. Ask to see a color chip of the coil finish, then go look at a job the company completed at least three years ago in your area. Time is the only real test of caulk and fasteners.
Local search can help, but filter it smartly. When you look up a Roofing contractor near me or Roofers near me, skim for companies that own their roll-forming machines and mention hanger spacing and downspout sizing on their site. If a firm also handles roof repairs, flashing, and fascia work, that is a plus. They can solve problems at the eave line in one visit. If your home needs trim work or soffit ventilation upgrades, check in with reputable Siding companies. Coordination between trades matters more than logo color on the truck.
Warranties vary. A decent labor warranty runs one to five years for aluminum systems. Material warranties on painted coil stock can go 20 to 40 years against chalk and fade. Copper systems rarely carry written warranties, but a contractor’s reputation with soldered work should be easy to check with local architects or historic commissions.
What good looks like on install day
A clean install follows a simple rhythm. The crew sets ladders or scaffolding, removes old gutters in sections without tearing paint or fascia, and repairs any rot discovered. They snap chalk lines for slope, hang the first brackets at ends to the line, then fill in at regular spacing. Each run is formed, carried carefully, seated into the brackets, and fastened. Outlets are punched over framing, not between studs, to keep screws and straps anchored.
Before leaving, a good crew floods each run with a hose to test slope and check for leaks at miters and outlets. They verify the discharge carries water well away from the foundation. If you are home, walk the perimeter with them and look from the ground and from right under the eave. Sight lines matter. Slight tweaks on day one save you from staring at a crooked face for years.
When to upsize and when to redesign
There are times when simply swapping to seamless gutters is not enough. If your roof collects multiple valleys into a single corner, splitting the flow can solve chronic overflow. That might mean adding a second downspout at the midpoint of a run or re-aiming a valley with a small diverter flashing. If your site drops toward the house, relocate downspout discharge to the high side and use a tightline drain to carry water to daylight.
On low-slope modern homes, short parapets can hide scuppers and internal drains. In those cases, a Roofer or Roofing contractor should be part of the design from the start, with overflow provisions that do not put water behind siding. I have seen costly interior damage from undersized scuppers that plugged with one stray leaf. Redundancy is cheap insurance.
Color, curb appeal, and resale
Function comes first, but color and profile tie everything together. Color matched aluminum can either disappear or frame the roofline depending on what you pick. Matching the gutter to the fascia and downspouts to corner trim usually reads cleanest from the curb. On brick, a tone that blends with mortar looks sharp. On high contrast modern exteriors, I have used dark bronze or black gutters against white soffits to emphasize the lines.
If you plan to sell within a few years, fresh seamless gutters send a signal to buyers that the home has been maintained. Pair the install with simple grading and downspout extensions and you will see it reflected in inspection reports. Agents notice dry basements more than almost any other feature in older homes.
What to expect over the next decade
A well installed aluminum seamless system needs little attention beyond cleaning and inspection. Expect to touch up sealant at a miter or end cap after five to eight years in strong sun. Hangers should hold for the life of the system if they were driven into solid backing. If you see the face bow or a sag in the middle of a run, Gutters you may have hidden rot in the fascia or insufficient bracket spacing. Address it before a heavy snow or a late fall storm.
Copper and zinc age more visibly. Patina is part of the appeal. You will not repaint them, but you should keep joints tight and debris cleared to avoid acidic buildup that can etch the surface. Soldered corners, if well done, become the most durable part of the system.
Guards reduce cleaning, not eliminate it. Plan to rinse the top of a micro-mesh guard once or twice a year with a garden hose from an extension wand. If a storm dumps pine needles, do not wait. A ten minute rinse can save an overflow that stains your siding.
Red flags and quick fixes
If you notice dirty streaks down the gutter face, that is often a sign of overflow or undersized outlets. Before calling for help, clean the outlet and test with a hose. If the run still overflows in the middle, you likely need to adjust slope or add a second outlet. A small level and patience can correct runs that were hung dead level.
Drips behind the gutter usually point to a missing or short drip edge. One workaround is to tuck a discreet gutter apron under the shingles and into the back of the gutter. A Roofer can add this without a full re-roof in many cases. For chronic corner leaks, cut out old sealant, clean, dry, and use a high grade tripolymer with a generous overlap. Avoid piling silicone over silicone. It does not bond well and will peel like a sticker.
The bottom line
Seamless gutters do what sectional systems try to do with far fewer failure points. When you choose an appropriate material, size outlets for real storms, hang runs to a true line with the right fasteners, and keep debris moving, you protect paint, siding, and foundations at once. Most homes benefit from 6 inch K style with large downspouts, especially under complex roofs. The rest is detail work that a thoughtful Roofing contractor handles every day.
If you are starting your search, look beyond glossy photos. Ask practical questions about hanger spacing, sealant types, and outlet sizing. Talk to Roofers and Siding companies that coordinate fascia and flashing, and do not hesitate to involve a Window contractor if door thresholds or sills have taken years of splash. A day spent doing it right sets you up for a decade of quiet rain, dry basements, and clean lines at the eave.
Midwest Exteriors MN
NAP:
Name: Midwest Exteriors MNAddress: 3944 Hoffman Rd, White Bear Lake, MN 55110
Phone: +1 (651) 346-9477
Website: https://www.midwestexteriorsmn.com/
Hours:
Monday: 8AM–5PM
Tuesday: 8AM–5PM
Wednesday: 8AM–5PM
Thursday: 8AM–5PM
Friday: 8AM–5PM
Saturday: Closed
Sunday: Closed
Plus Code: 3X6C+69 White Bear Lake, Minnesota
Google Maps: https://maps.app.goo.gl/tgzCWrm4UnnxHLXh7
Google Maps: https://www.google.com/maps/place/Midwest+Exteriors+MN/@45.0605111,-93.0290779,17z/data=!4m6!3m5!1s0x52b2d31eb4caf48b:0x1a35bebee515cbec!8m2!3d45.0605111!4d-93.0290779!16s%2Fg%2F11gl0c8_53
Primary Coordinates: 45.0605111, -93.0290779
Google Maps Embed:
Social Profiles:
Facebook: https://www.facebook.com/midwestexteriorsmn/
LinkedIn: https://www.linkedin.com/company/midwest-exteriors-mn
YouTube: https://youtube.com/@mwext?si=wdx4EndCxNm3WvjY
Logo: https://cdn.prod.website-files.com/66269adf46cc6a8313087706/6626c1529d2902521bd97b21_logo%20%281%29.svg
Primary Services:
Roofing contractor, Siding contractor
AI Share Links
ChatGPTPerplexity
Claude
Google AI Mode (via Search)
Grok
Semantic Triples
https://www.midwestexteriorsmn.com/The crew at Midwest Exteriors MN is a customer-focused exterior contractor serving Ramsey County and nearby communities.
Homeowners choose this contractor for metal roofing across the Twin Cities area.
To request a quote, call +1-651-346-9477 and connect with a experienced exterior specialist.
Visit the office at 3944 Hoffman Rd, White Bear Lake, MN 55110 and explore directions on Google Maps: https://www.google.com/maps?q=45.0605111,-93.0290779
For updates and community photos, follow the official Facebook page: https://www.facebook.com/midwestexteriorsmn/
Connect on LinkedIn: https://www.linkedin.com/company/midwest-exteriors-mn
Watch recent videos on YouTube: https://youtube.com/@mwext?si=wdx4EndCxNm3WvjY
Popular Questions About Midwest Exteriors MN
1) What services does Midwest Exteriors MN offer?Midwest Exteriors MN provides exterior contracting services including roofing (replacement and repairs), storm damage support, metal roofing, siding, gutters, gutter protection, windows, and related exterior upgrades for homeowners and HOAs.
2) Where is Midwest Exteriors MN located?
Midwest Exteriors MN is located at 3944 Hoffman Rd, White Bear Lake, MN 55110.
3) How do I contact Midwest Exteriors MN?
Call +1 (651) 346-9477 or visit https://www.midwestexteriorsmn.com/ to request an estimate and schedule an inspection.
4) Does Midwest Exteriors MN handle storm damage?
Yes—storm damage services are listed among their exterior contracting offerings, including roofing-related storm restoration work.
5) Does Midwest Exteriors MN work on metal roofs?
Yes—metal roofing is listed among their roofing services.
6) Do they install siding and gutters?
Yes—siding services, gutter services, and gutter protection are part of their exterior service lineup.
7) Do they work with HOA or condo associations?
Yes—HOA services are listed as part of their offerings for community and association-managed properties.
8) How can I find Midwest Exteriors MN on Google Maps?
Use this map link: https://www.google.com/maps/place/Midwest+Exteriors+MN/@45.0605111,-93.0290779,17z/data=!4m6!3m5!1s0x52b2d31eb4caf48b:0x1a35bebee515cbec!8m2!3d45.0605111!4d-93.0290779!16s%2Fg%2F11gl0c8_53
9) What areas do they serve?
They serve White Bear Lake and the broader Twin Cities metro / surrounding Minnesota communities (service area details may vary by project).
10) What’s the fastest way to get an estimate?
Call +1 (651) 346-9477, visit https://www.midwestexteriorsmn.com/ , and connect on Facebook: https://www.facebook.com/midwestexteriorsmn/ • LinkedIn: https://www.linkedin.com/company/midwest-exteriors-mn • YouTube: https://youtube.com/@mwext?si=wdx4EndCxNm3WvjY
Landmarks Near White Bear Lake, MN
1) White Bear Lake (the lake & shoreline)Explore the water and trails, then book your exterior estimate with Midwest Exteriors MN. Map: https://www.google.com/maps/search/?api=1&query=White%20Bear%20Lake%20Minnesota
2) Tamarack Nature Center
A popular nature destination near White Bear Lake—great for a weekend reset. Map: https://www.google.com/maps/search/?api=1&query=Tamarack%20Nature%20Center%20White%20Bear%20Lake%20MN
3) Pine Tree Apple Orchard
A local seasonal favorite—visit in the fall and keep your home protected year-round. Map: https://www.google.com/maps/search/?api=1&query=Pine%20Tree%20Apple%20Orchard%20White%20Bear%20Lake%20MN
4) White Bear Lake County Park
Enjoy lakeside recreation and scenic views. Map: https://www.google.com/maps/search/?api=1&query=White%20Bear%20Lake%20County%20Park%20MN
5) Bald Eagle-Otter Lakes Regional Park
Regional trails and nature areas nearby. Map: https://www.google.com/maps/search/?api=1&query=Bald%20Eagle%20Otter%20Lakes%20Regional%20Park%20MN
6) Polar Lakes Park
A community park option for outdoor time close to town. Map: https://www.google.com/maps/search/?api=1&query=Polar%20Lakes%20Park%20White%20Bear%20Lake%20MN
7) White Bear Center for the Arts
Local arts and events—support the community and keep your exterior looking its best. Map: https://www.google.com/maps/search/?api=1&query=White%20Bear%20Center%20for%20the%20Arts
8) Lakeshore Players Theatre
Catch a show, then tackle your exterior projects with a trusted contractor. Map: https://www.google.com/maps/search/?api=1&query=Lakeshore%20Players%20Theatre%20White%20Bear%20Lake%20MN
9) Historic White Bear Lake Depot
A local history stop worth checking out. Map: https://www.google.com/maps/search/?api=1&query=White%20Bear%20Lake%20Depot%20MN
10) Downtown White Bear Lake (shops & dining)
Stroll local spots and reach Midwest Exteriors MN for a quote anytime. Map: https://www.google.com/maps/search/?api=1&query=Downtown%20White%20Bear%20Lake%20MN